2016/11/25

Lemon earl grey tea bundt cake 香檸紅茶奶油蛋糕


Inspired by traditional lemon bundt cake, I designed my own version of lemon bundt cake. It is lighter but still moist. Black tea is a perfect match to lemon, it gives simple lemon cake richer flavor and taste. You will be amazed by this gourmet!
Inspired by traditional lemon bundt cake, I designed my own version of lemon bundt cake.  Black tea is really a perfect match to lemon, it gives simple lemon cake richer flavor and taste.
受傳統檸檬棒蛋糕的啟發,我自己配了檸檬蛋糕的食譜。加入了紅茶粉不僅把檸檬香味給帶了出來,濃濃的奶油香更讓這款蛋糕的口味更豐富!

 It is lighter but still moist.You will be amazed by this gourmet!
這款蛋糕的口感較傳統重奶油蛋糕輕,非常濕潤。


Ingredients: For one 8" round cake.
材料:可做一個八吋蛋糕

A. For the cake 蛋糕體: 
4 yolks 蛋黃
135g granulated sugar 細砂糖
 4 egg whites 蛋白
120g cake flour 低筋麵粉
15g earl grey tea powder 伯爵紅茶粉
40g whole fat milk (room temperature) 室溫全脂牛奶
130g melted butter 融化奶油
few pinch of lemon zest 少許 檸檬皮

  • B. For the Glaze 糖霜: 
236g confectioners' sugar
  • 40g fresh lemon juice
  • few pinch of lemon zest 少許 檸檬皮

Before you start:
準備工作:
1. Grind black tea leaves into powder, zest lemon.
    將紅茶葉磨成碎屑, 削檸檬皮。

2. Sift flour and black tea powder collectively, separate egg whites and yolks.
   將麵粉和紅茶粉一起過篩,將蛋白和蛋黃分離。

3. Melt butter and cool it down to room temperature.
    融化奶油並放室溫。

4. Butter and flour baking pan.  
    將烤模上油、撒上麵粉,以方便脫模。

5. Preheat oven to 170 degrees.
     烤箱預熱到170度。


Preparation 做法:
For the cake 香檸紅茶蛋糕體:
1. Use an electric whisk to whisk yolks and half of sugar until foamy. When you see the colour of yolks looks like the colour of baby ducks, usually it is ready.
用電動打蛋器打發蛋黃和一半的糖直到呈現緞帶狀態,通常打發的蛋黃會呈現像鵝黃色的顏色。

2. Make meringue: whisk eggs whites until soft peak and add in the rest of sugar in three times. Whisk until firm peak.
打發蛋白: 將蛋白打發到濕性發泡後,分三次加入剩下的糖並打到中性發泡(尾端挺立)。                                

3. Take a bit of meringue and lightly whisk it with whisked yolks. We do this is because the texture of yolks is thicker than meringue, by adding a bit of meringue first can help mixing more easily when you deal with large amount of meringue.
拿一小部分的打發蛋白混入蛋黃,輕輕的混合。因為蛋黃的質地較濃稠,取質地較柔軟的蛋白會稍微稀釋蛋黃,等下個步驟混入大量的蛋白時較容易。

4. Use a spatula to mix the rest of meringue and the yolk-meringue mixture you got from step 3. Mix lightly and gently.
用攪拌匙以上下翻拌的方式混和剩下的蛋白和蛋黃。


5. Now add in dry ingredients, mix evenly. Then finally add in milk and melted butter. Mix the batter fast but gently.
混入乾料並混和均勻。最後混入牛奶和融化奶油。


7. Pour the batter into a pan from high point and tape the pan on table for few times to kill bubbles.
將麵糊由較高處倒入蛋糕模,並將蛋糕模在桌上輕敲數十下以去除氣泡。

8. Bake in oven for approximately 25 mins at 170 degrees.
送入烤箱烘烤約25分鐘,170度。

9. Cool ythe cake on a cooling rack until completely cooled.
連同模具一起放涼,等到蛋糕完全涼透才能脫模。蛋糕脫模才漂亮。

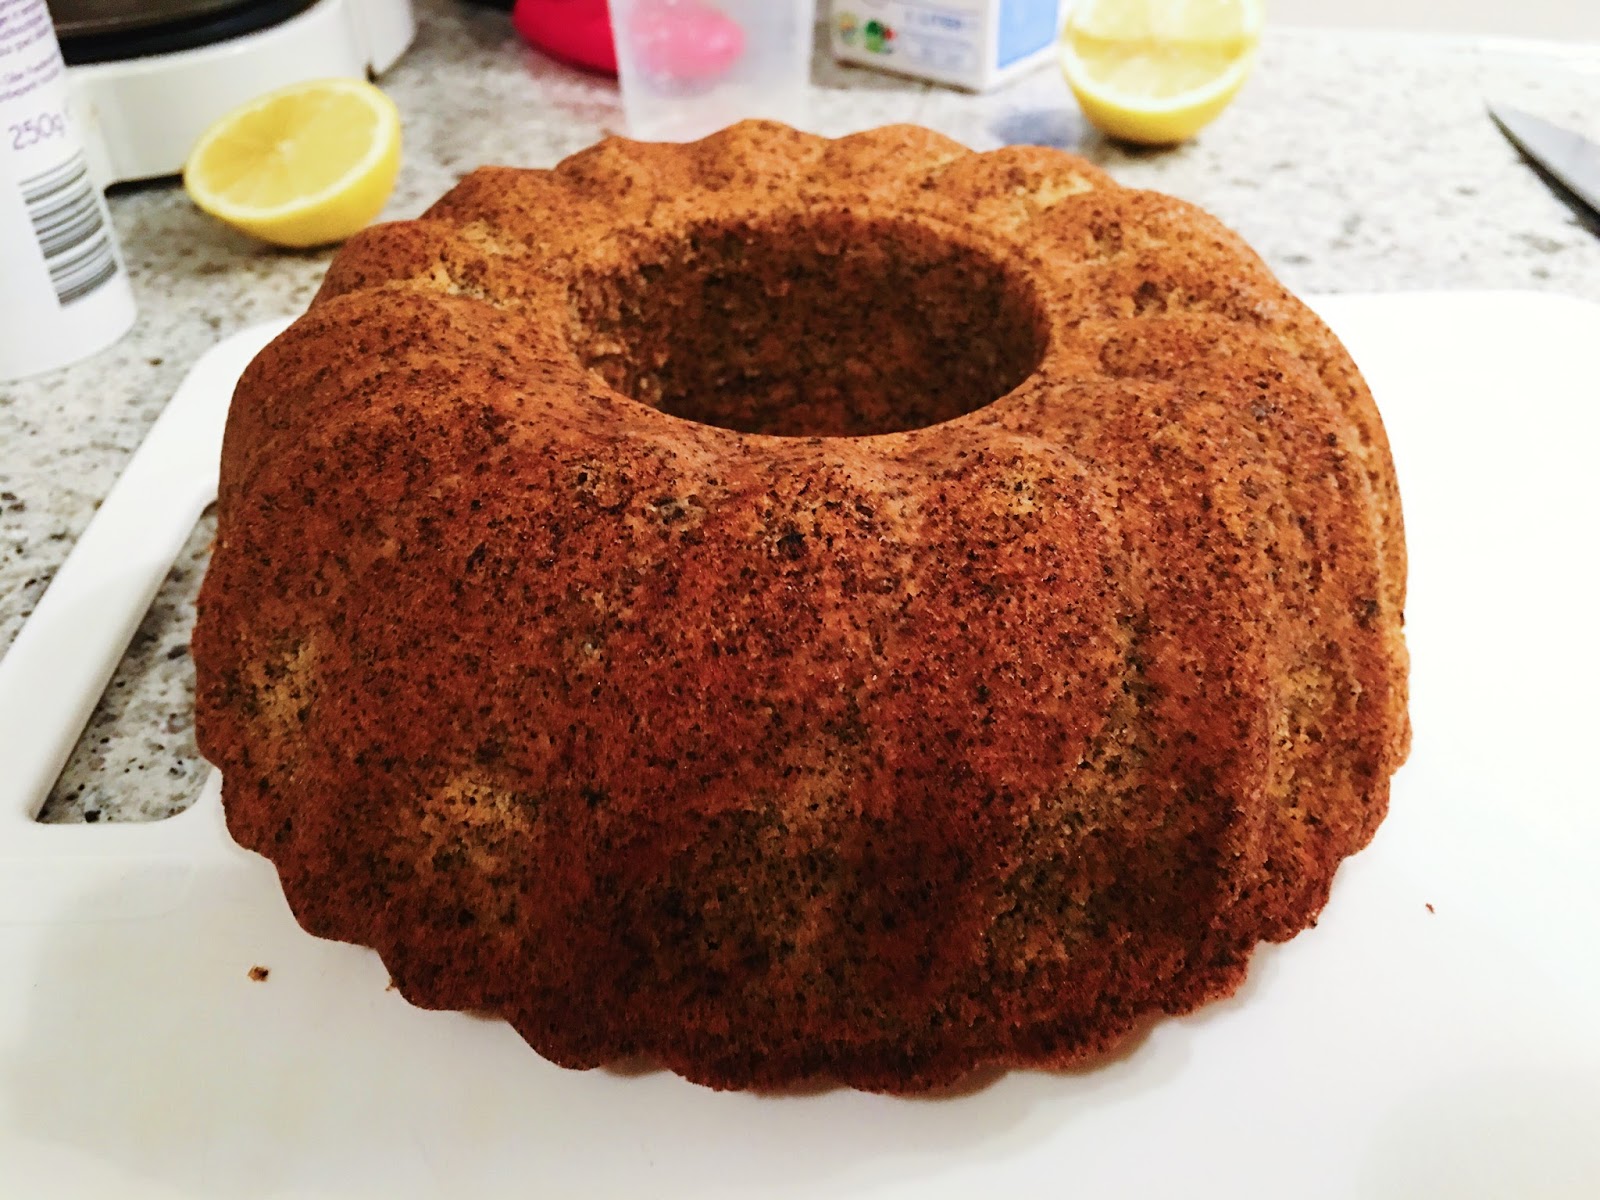
Yay!!! Golden brown!!!
金黃色!!
 \


For the glaze 檸檬糖霜:
1. Simply mix sugar powder, lemon zest and fresh lemon juice until even.
將新鮮檸檬汁、檸檬屑和糖粉混合均勻即可。

2. Glaze your cake the way you want and decorate it.
 將糖霜淋在蛋糕上並裝飾。

The best timing to eat this cake is to wait until the next day. Wait until the cake absorbs the flavour of butter and milk!
最佳的食用時機是最好等上一天,讓奶油的香味更沉入蛋糕內哦! 


Preserve the cake at room temperature, not in the fridge. If you want the cake to be softer, heat it in the microwave for about 5-10 seconds.
保存方式是放置室內,不要放冰箱,因為含大量奶油,蛋糕會變很硬。若是喜歡柔嫩的口感,可以放入微波爐個5-10秒鐘哦! 

2016/11/16

Gâteau au chocolat 古典巧克力蛋糕

A chocolate cake for chocolate lovers.
一款給巧克力愛好者的蛋糕

This gateau au chocolat is very moist. It really melts in your mouth!
這個古典巧克力蛋糕,巧克力味非常濃郁且濕潤,真的是入口即化!

Ingredients: For one 8" round cake
材料:可做一個八吋蛋糕

A. For the chocolate sponge 
     巧克力蛋糕體: 
80g butter 奶油
70g heavy whipping cream (35%  of fat) 動物鮮奶油
90g semi-sweet chocolate (72% of cocoa) 苦甜巧克力
4 yolks 蛋黃
136g granulated sugar 細砂糖
 4 egg whites 蛋白
48g cocoa powder 無糖可可粉 
42g cake flour 低筋麵粉

B. For the glaze (ganache):
     巧克力甘納許淋面:
50g semi-sweet chocolate (72% of cocoa) 苦甜巧克力
70g cream ( 35g% of fat) 動物性鮮奶油
10g honey 蜂蜜


Before you start:
準備工作:
1. Sift flour and cocoa powder collectively, separate egg whites and yolks.
   將可可粉、麵粉一起過篩,將蛋白和蛋黃分離。

2. Butter and flour baking mold.  
    將烤模上油、撒上麵粉,以方便脫模。

3. Preheat oven to 170 degrees.
     烤箱預熱到170度。


Preparation 做法:
A. For the chocolate sponge:
     巧克力蛋糕體: 

1. Make ganache: bring whipping cream and butter to almost boil, gently pour it onto chopped chocolate and stir the mixture while pouring the creams.
    將鮮奶油、奶油加熱至快煮沸,再煮沸前慢慢倒入在切碎的巧克力塊上,並邊攪拌至均
勻。
                     

Note: The cream and butter shouldn't be too hot, should only be hot enough to melt chocolate!
          鮮奶油和奶油不能太燙,只要加熱至剛好能溶化巧克力的溫度就好。 

2. Mix yolks and half quantity of sugar in a double boiler. When the temperature of yolks reach to 37-38 degree, mix it with ganache (step 1).
    將蛋黃和一半的糖混和,並以隔水加熱方式攪拌至人體溫度後,加入步驟1,攪拌至滑順的巧克力糊。


3. Make meringue: beat egg whites with an electric whisk until foamy. Add in the rest of sugar at one time and beat until soft peak.
     蛋白用打蛋器以高速打至粗泡後,一口氣加入全部砂糖,並打至濕性發泡。

4. Take half of the dry ingredients (cocoa powder and flour) and gently mix with chocolate-yolk mixture until evenly. Then add in half of the meringue and mix until evenly again.
     將一半的粉類和蛋黃湖混和至均勻後,再加入一半的打發蛋白並混和至均勻。

5. Repeat step 4 until you have a chocolate cake batter.
     重複步驟4,直到所有混和材料完成。

6. Pour the chocolate cake batter into a mold and tap the mold on table for at least 50 times to release big bubbles.
     將麵糊倒入烤模,並將烤模舉起在桌上輕輕震50下,以敲出空氣。

Note: As I said in the beginning, this recipe is to make a 8 inch round mold cake but you can also use bundt pan:)
            雖然這個食譜是拿做8吋圓形蛋糕,但是也可以使用磅蛋糕的模來做歐。

7. Bake in the oven for around 40-45 mins. To check if your cake is ready, you can insert a toothpick in the cake and if the toothpick comes out clean, means your cake is ready.
     將蛋糕送入烤箱,烘烤時間約40-45分鐘,依烤箱而定。用牙籤插入蛋糕中心,但牙籤拿出來時沒有沾黏的話就代表烘烤完成。

8. Remove cake from oven and put it upside down on a cooling rack for cooling.
     將蛋糕移出烤箱並倒放在涼架上放涼。


B. For chocolate glaze: 
    巧克力淋面:

9. While the cake body is on the cooling process, make glaze. Bring cream to almost boil, then gently pour it onto chopped chocolate and stir the mixture at the same time. Stir the ganache until smooth.
      當蛋糕體還在降溫時,即可製作巧克力淋面。將鮮奶油加熱至快煮沸,再煮沸前慢慢倒入在切碎的巧克力塊上,並邊攪拌至均勻。

10. Then add in honey. Again stir it until smooth and even.
      加入蜂蜜後,再次攪拌至均勻滑順。      

11. Let glaze cool down until its texture is firm enough before using. 
      讓巧克力淋面放涼凝固至可以使用為止。

12. Slowly and evenly pour glaze on the sponge and let it set up before serving.
      將巧克力淋面慢慢地、均勻地淋在蛋糕上,等巧克力淋面凝固後再食用。
Note: You can glaze the cake however you like.. Improvise the part that has not enough of glaze, as long as the result is beautiful. Literally, there is no technique for it :)
關於怎麼淋面,其實我就是很隨興的順時鐘淋面,有缺的地方補一下,該停的時候就停,其實不難哦!


You can decorate the cake with few pieces of gold sheet. Very simple decoration but looks elegant.
可以用幾片金箔來裝飾這款蛋糕,簡單卻優雅! 


Looks even more beautiful on cake plate! 裝在蛋糕盤子裡更美了!!! <3